Paying it Forward: Documenting Your Hardware Project
Approaches to documenting a hardware description language using lxsocdoc
Sean Cross - https://xobs.io/ - @xobs
Undocumented Hardware = Bad
(But so easy to do!)
Undocumented hardware is bad. There are all sorts of quirks, and even if you have
the source code, it can be very difficult to read. I'm the primary developer for
the Fomu project, and this talk will cover some of the issues I've run into with
respect to documentation. It is most directly related to the LiteX and Migen
projects, but the concepts will carry over into any other Hardware Description
Language you may use.
The goal of this talk is to show how it's easy to document hardware with
the right framework, and how it's easier to have a project that's documented
than one that isn't.
About Me
My name is Sean Cross, also known as "xobs". I will be speaking later this week
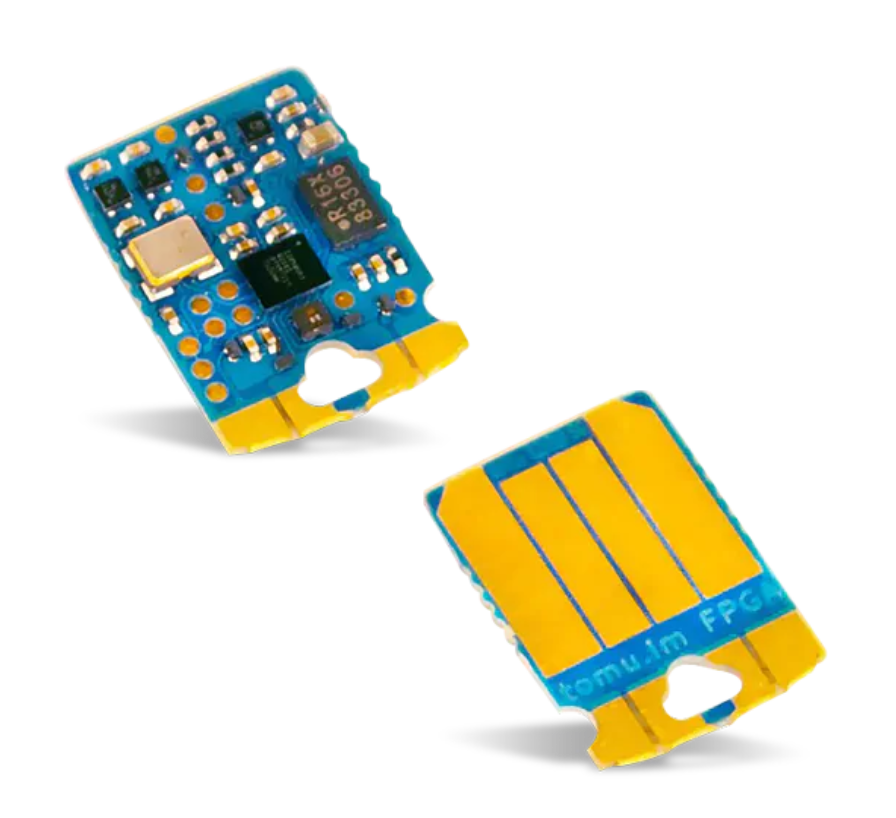
on the Betrusted project, but many know me as the main developer behind the Fomu
project. Fomu is an FPGA that fits in your USB port. One of my goals with the
Fomu project was to allow people to treat it as just a RISC-V CPU in their USB
port, which means now we need to make documentation. This talk covers some of
the problems I ran into while working on this project, and the solutions I came
up with.
Reference Manuals
Datasheet ≠ Reference Manual
How many people here know what a reference manual is? These are documents that
you hopefully get from the manufacutrer of a chip that tell you how to use it.
These are the single most important part of developing a chip the normal way, as
they give you all of the information on how to use a chip. They can include
everything from which memory addresses to poke to cause a pin to become an output,
or how to set up the video block to output data. Here is the first page from
the reference manual for the i.MX6 used in the Novena. You'll note that "Chapter
1: Introduction" starts on page 197 -- everything before it was a table of contents
-- and is almost 6000 pages long. As an aside, reference manuals
aren't datasheets -- datasheets tend to include electrical and operating
information, and tend to be much shorter.
Enterprise Documentation
So how is this monster of a document written? I've asked several documentation
writers from professional chip vendors, and they say that they have a whole team
of people using a very advanced piece of realtime typesetting software.
Most enterprise documentation is written by a team of writers using Microsoft Word.
We're open source developers, and we prefer to use our own tools such as Git and CI
to create documentation for us. Because we're lazy. And prone to making mistakes.
Talk Outline
How to write HDL Code
Rationale behind lxsocdoc
Examples of lxsocdoc
Benefits of this approach
I'll briefly cover various methods of writing HDL code, then cover the rationale
behind the approach we take with lxsocdoc, then give an example of how to use
lxsocdoc and how you might apply it to your language. Finally, I'll cover the
implications of having documented hardware and how this will help you pay it forward.
Motivation
// Hardware definitions of the SoC. Also is the main repo of
// documentation for the programmer-centric view
// of the hardware.
/* Start of memory range for the UART peripheral */
#define UART_OFFSET     0x10000000
/* Offset of the data register for the debug UART. A write
   here will send the data out of the UART. A write when a
   send is going on will halt the processor until the send is
   completed. A read will receive any byte that was received
   by the UART since the last read, or 0xFFFFFFFF when none
   was. There is no receive buffer, so it's possible to miss
   data if you don't poll frequently enough.
   The debug UART is always configured as 8N1. */
#define UART_DATA_REG   0x00
mach_defines.h , Hackaday 2019 Con Badge
Verilog and VHDL are kind of the C or assembly of the FPGA world. They're universal,
but somewhat unwieldy to use. You need to manually set up your address decoders,
and documentation is very free-form. Common approaches today involve comments in
the HDL and/or C header files. This works, but we can do better. We just need to
describe the hardware better.
Lots of Documentation
This documentation is very extensive. The start of Chapter 1 is on page 197, with all
previous pages being the Table of Contents. It's almost 6000 pages. It's very
extensive, because it's a very complicated chip.
About LiteX
Hardware Description Language embedded in Python
Doesn't run Python in hardware!
Emits Verilog (or Yosys netlists)
Makes it easy to create a SoC
Powers the LCA2020 video production setup
Fomu uses LiteX, which is related to Migen. This is a hardware description language
written in Python. You write Python code and run the program, and it generates
a design file -- either Verilog code, or a Yosys netlist. There are many other
alternatives such as SpinalHDL or Chisel. By writing in Python as opposed to
direct Verilog, we get a lot of nice primitives. The examples from this talk
are taken from lxsocdoc and LiteX, but most higher-level hardware description
languages can take similar approaches to documentation.
LiteX Primitives
class GPIOOut(Module, AutoCSR):
    def __init__(self, signal):
        self._out = CSRStorage(len(signal))
        self.comb += signal.eq(self._out.storage)
In LiteX, two of the primitives used to expose hardware registers to the CPU softcore
are CSRStorage and CSRStatus. Instead of manually wiring up a crossbar and decoding
the addresses ourselves, we just need to write `self.regname = CSRStatus(8)`,
and the build system will wire up 8 bits of read-only memory to the target CPU.
Similarly, `self.othername = CSRStorage(8)` will give 8-bits of write-only memory.
Case Study: SPI Bitbang Module
self.bitbang = CSRStorage(4)
If(self.bitbang.storage[3],
    dq.oe.eq(0)
).Else(
    dq.oe.eq(1)
),
# CPOL=0/CPHA=0 or CPOL=1/CPHA=1 only.
If(self.bitbang.storage[1],
    self.miso.status.eq(dq.i[1])
),
dq.o.eq(
    Cat(self.bitbang.storage[0], Replicate(1, spi_width-1))
)
This works well, but exposes a new problem: Documentation. As an example, I was
working with the SPI Flash block in litex, and wanted to know how the bitbang
driver worked. There wasn't any documentation except the source, which looked
like this.
You can kind of understand it, but it does take a lot of mental power to
work through it. I started by creating aliases for the various elements
in the storage array, but then I thought: There has to be a better way!
Aside: Python Docstrings
def _format_cmd(cmd, spi_width):
    """
    `cmd` is the read instruction. Since everything is
    transmitted on all dq lines (cmd, adr and data), extend/
    interleave cmd to full pads.dq width even if dq1-dq3 are
    don't care during the command phase: For example, for
    N25Q128, 0xeb is the quad i/o fast read, and extended
    to 4 bits (dq1,dq2,dq3 high) is: 0xfffefeff
    """
    c = 2**(8*spi_width)-1
    for b in range(8):
        if not (cmd>>b)%2:
            c &= ~(1<<(b*spi_width))
    return c
As an aside, Python has something called Pydoc and Docstrings. These are
comments that go at the top of functions and classes that let you describe
what a Python object is and how to use it. This is almost what we want,
except once the final SoC is generated we don't really care so much about
things like constructor arguments or method properties. Documentation for
the end user is different from documentation for the module developer.
New Register Definition
self.bitbang = CSRStorage(4, fields=[
    CSRField("mosi", description="Output value for MOSI..."
    CSRField("clk", description="Output value for SPI CLK..."
    CSRField("cs_n", description="Output value for SPI C..."
    CSRField("dir", description="Sets the dir...", values=[
        ("0", "OUT", "SPI pins are all output"),
        ("1", "IN", "SPI pins are all input"),
    ])
], description="""Bitbang controls for SPI output.  Only
    standard 1x SPI is supported, and as a result all
    four wires are ganged together.  This means that it
    is only possible to perform half-duplex operations,
    using this SPI core.""")
This is when I hit upon the idea of `lxsocdoc`. The basic idea is that
Python is really good at introspecting Python, so let's add a little bit
more information to the CSR objects to make our life easier. And so, after
working with the LiteX creator Florent, we refactored the bitbang
definition to this.
Refactored SPI Bitbang
If(self.bitbang.fields.dir,
    dq.oe.eq(0)
).Else(
    dq.oe.eq(1)
),
# CPOL=0/CPHA=0 or CPOL=1/CPHA=1 only.
If(self.bitbang.fields.clk,
    self.miso.status.eq(dq.i[1])
),
dq.o.eq(
    Cat(self.bitbang.fields.mosi, Replicate(1, spi_width-1))
)
Now the actual bitbang logic looks like this.
This is a little bit easier to understand -- no longer are we looking at indices
in an array to determine what field does what. Instead we get actual named fields.
But because Python can introspect Python very easily, this is just the beginning.
Generating a Manual
After the design is elaborated and the output file is generated, we can iterate
through the resulting tree and pick out any CSR objects and using any additional
information. We can actually generate a full reference manual, just like one you
would receive from a SoC Vendor.
For example, this is what the start of the Fomu SPI Flash documentation looks like:
[Register Listing for LXSPI]
This is already pretty useful. You can hand this file to someone and show them
how your design works. But the title of this talk is called "Paying it Forward",
and I can tell you from experience that having such a reference manual for yourself
while developing software for your own hardware is still invaluable. Hardware
designs are complex things, and not having to decode bitfield offsets in your
head or constantly referring to various sections of code to see how it's implemented
saves valuable time.
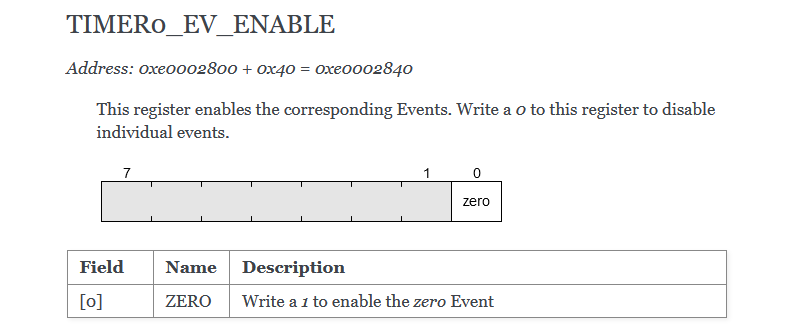
Interrupts
We can even extract interrupt information, including which bits inside an
interrupt register map to which event, and which interrupt number is assigned
to a given module.
Undocumented Fields
It turns out that there is enough information that we can extract that
even undocumented fields are somewhat useful. This is an undocumented
interrupt register, but lxsocdoc has pulled out the field names and
is giving useful documentation anyway.
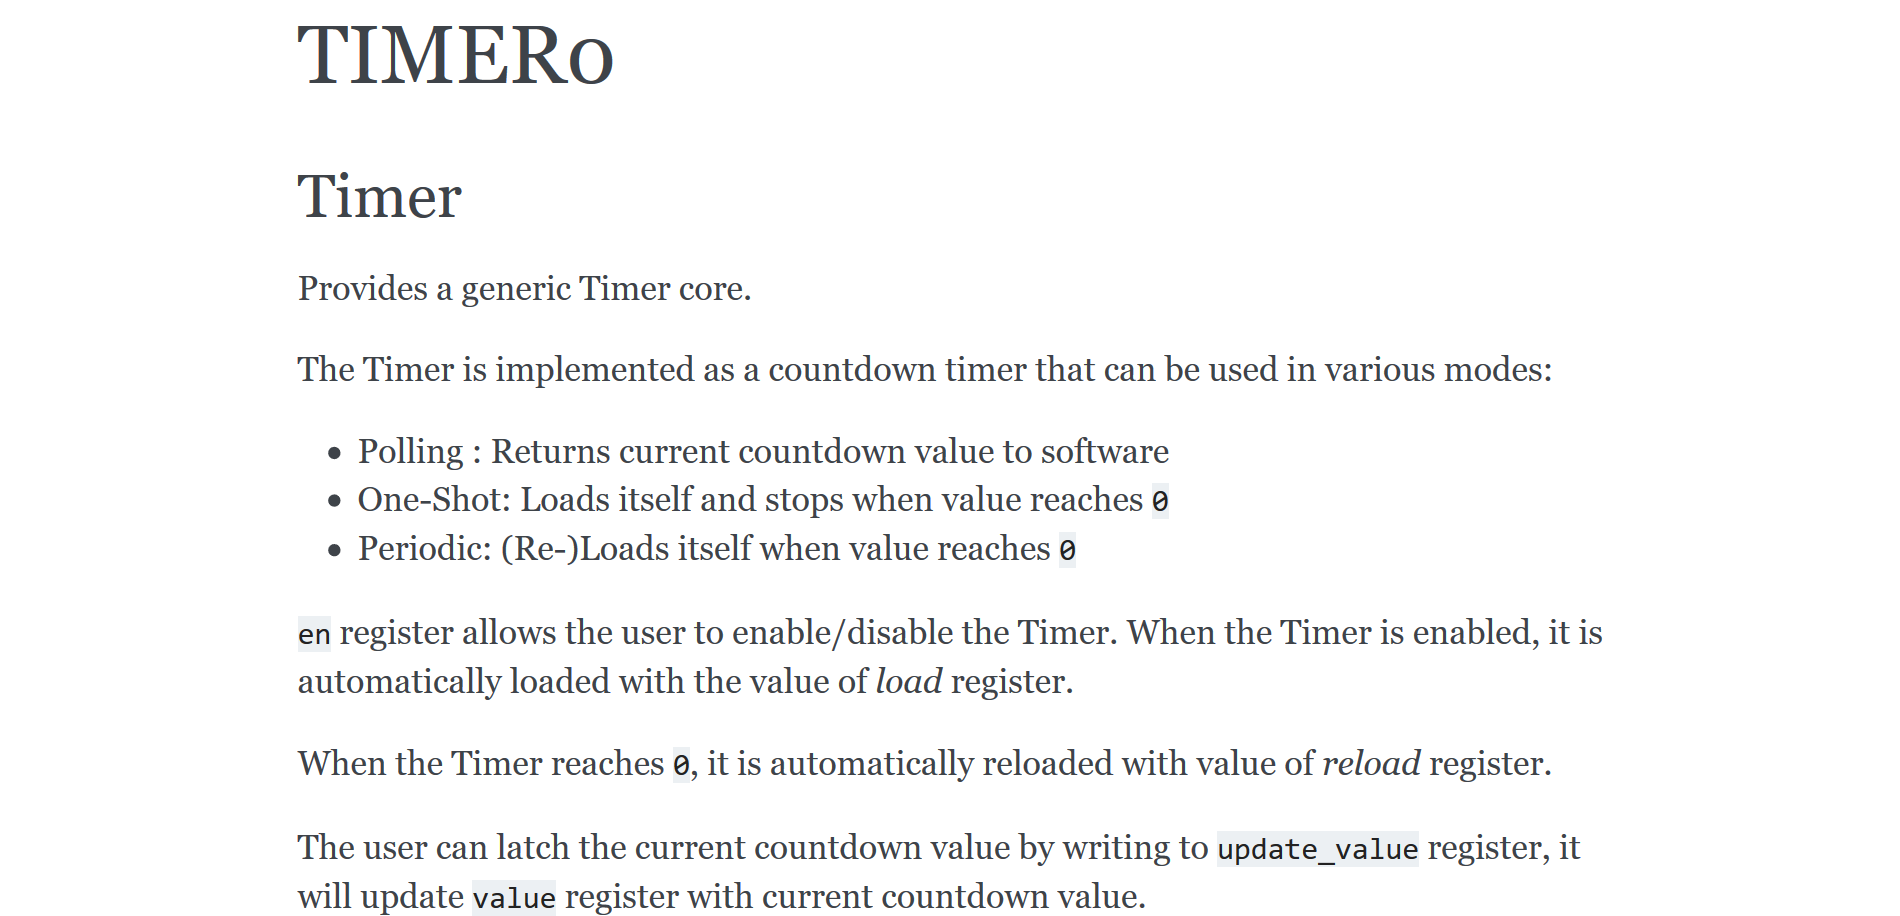
More Documentation: ModuleDoc
So now we have register documentation. Can we do better? Of course we can.
SoC reference manuals are more than just register definitions. They also include
background information on protocols, as well as more elaboration on how the block
works. We can take a cue from CSRs themselves, and add module documentation
in a similar fashion.
Protocol Documentation
We can add additional documentation such as protocol waveforms. Here
we use WaveDrom to define the protocol of Wishbone-over-SPI. There
are multiple formats of the protocol depending on which version is
instantiated.
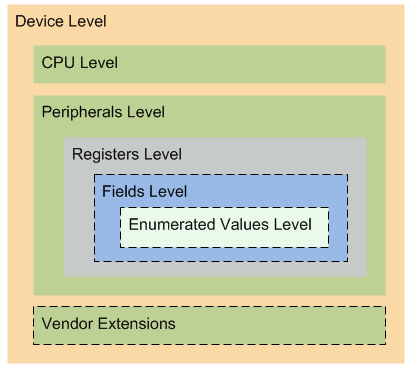
SVD: Documentation for Machines
XML description file
Interrupt numbers
Memory layout
Register definitions
Register fields
Source: keil.com
Having documentation for humans is great, but we can go one step further and
make documentation for computers. SVD is an XML format defined by ARM that
defines various aspects about a chip, including memory layout, interrupt map,
and register sets. SVD includes information such as default values and field
bits, all information we have thanks to the introspectability of Python.
SVD2Rust: Generating Safe Accessors
fn init(&mut self) {
    self.registers
        .ctrl
        .write(|w| w.exe().bit(true).curren().bit(true).rgbleden().bit(true));
    self.write(LEDDEN | FR250 | QUICK_STOP, LedRegister::LEDDCR0);

    // Set clock register to 12 MHz / 64 kHz - 1
    self.write(((12_000_000u32 / 64_000u32) - 1) as u8, LedRegister::LEDDBR);

    self.write(
        BREATHE_ENABLE | BREATHE_MODE_FIXED | breathe_rate_ms(128),
        LedRegister::LEDDBCRR,
    );
}
In addition to generating a reference manual for humans, we can generate an SVD
file that's usable in a wide variety of areas. For example, we can turn an SVD
file into a Rust Peripheral Access Crate (PAC) using `SVD2Rust`, giving us an
easy way to safely access all peripherals on a device.
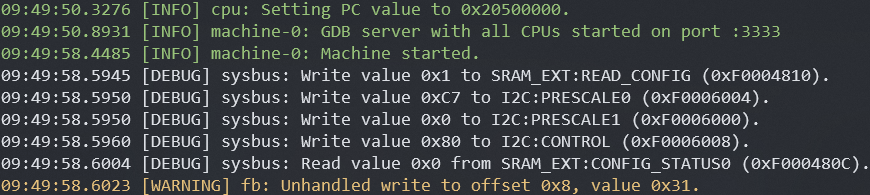
Renode: Fancy Register Logging
We can also import this SVD file into an emulator such as Renode, which will
print out fields and flags that get accessed, giving us greater visibility into
what a program is doing.
Benefits of Higher Level Languages
Greater code reuse
More hardware description
Better interoperability
Automatic document generation
Automatic SVD
By using a higher level language, we are able to describe the hardware
in greater detail than if we used Verilog or VHDL. We can add additional
fields to our register definition fields to provide nice, human-readable
documentation. This also allows us to generate machine-readable formats
such as SVD, which opens up a whole world of software.
Documentation helps others
Documentation helps you
Documenting your hardware is important because it is necessary for you to
write software that interfaces with it today, and it helps you work with
others when it comes time to share your design with the world. By
properly documenting various fields within your module, you make it easier
on yourself to interact with today, and you make it easier to let others
get up to speed in the future. By documenting your hardware, you're helping
to pay it forward.